The modify workflow is not supported by the VRA installation kit. To change the Portal address or user information for a vSphere Recovery Agent, you must uninstall the VRA, reinstall it with the new Portal registration, and then reregister the VRA with the vault.
To change the Portal registration for a vSphere Recovery Agent:
1. On the machine where the VRA is installed, back up the log files in the folder where the Agent is installed.
2. Uninstall the VRA.
3. Reinstall the VRA. When prompted to register the Agent with Portal, enter the new Portal registration information.
4. On the navigation bar in Portal, click Computers.
The Computers page shows registered computers.
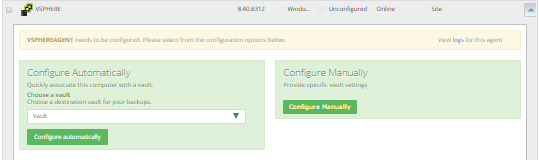
5. Find the VRA that you installed, and expand its view by clicking its row.
The Configure Automatically and Configure Manually boxes appear.
6. Click Configure Manually.
7. On the Vault Settings tab, click Re-register.

8. In the Vault Settings dialog box, do one of the following:
•In the Vault Profile list, select the vault with backups from the original vSphere Agent. Vault information and credentials are then populated in the dialog box.
•In the Vault Name box, enter a name for the vault. In the Address box, enter the host name or IP address of the vault with backups from the original VRA. In the Account, Username, and Password boxes, enter an account and credentials for backing up data to and restoring data from the vault.
Specifying the host name of the vault is recommended. This will allow DNS to handle IP address changes.
9. Click Load Computers.
10. In the list of computers, click the name of the original VRA. Click Save.
11. In the Confirmation message box, click Yes.
12. On the vCenter Settings tab, type the username and password for authenticating with the vCenter.
13. Click Save. A Success message appears. Click Okay.
14. On the Jobs tab, do the following for each backup job:
a. In the Select Action menu for the job, click Edit Job.
b. In the Edit Job dialog box, re-enter the encryption password for the job in the Password and Confirm Password boxes.
IMPORTANT: To avoid reseeding the job, you must enter the encryption password that was used when the original VRA ran the backup job.
c. Save the job.
d. In the Select Action menu for the job, click Synchronize.
15. On the Advanced tab, if a Notifications tab appears and you can edit SMTP settings, enter and save SMTP credentials. Click Save.