You can restore files and folders from a protected Windows VM using the vSphere Recovery Agent (VRA).
Note: You cannot restore files and folders from Linux VMs using the VRA.
Note: If you are restoring files and folders using the vSphere Agent, see Restore files and folders using a vSphere Agent.
During a file and folder restore, volumes from the selected VM are mounted as drives on the machine where the VRA is running. You can then:
•Share some or all of the mounted drives so that users can copy files and folders from the drives.
•Sign in to the VRA machine and copy files and folders from the mounted drives. Files and folders on the disks will be accessible to anyone on the VRA system, including non-Admin users. If you are concerned about security, secure the Agent machine and prevent users from logging in to the machine locally.
You can restore files and folders from more than one VM at the same time.
To restore files and folders using vSphere Recovery Agent:
1. On the navigation bar, click Computers.
A grid lists available computers.
2. Find the vSphere environment with the VM that you want to restore, and expand its view by clicking the row.
3. Click the Jobs tab.
4. Find the backup job with the VM that you want to restore, and click Restore in the job’s Select Action menu.
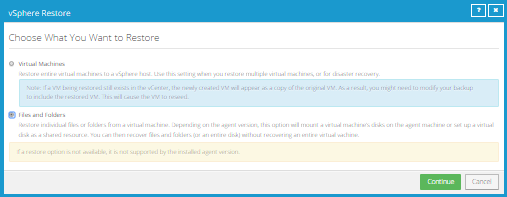
5. In the Choose What You Want to Restore dialog box, select Files and Folders.
6. Click Continue.
The Restore dialog box shows the most recent safeset for the job.
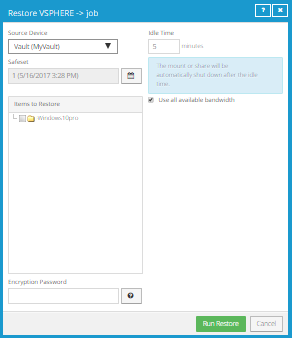
7. To restore data from another source, click a source in the Source Device list.
8. To restore from
an older safeset, click the Browse Safesets button.  In the calendar that appears, click the
date of the safeset from which you want to restore. To the right of the
calendar, click the specific safeset from which you want to restore.
In the calendar that appears, click the
date of the safeset from which you want to restore. To the right of the
calendar, click the specific safeset from which you want to restore.
9. In the Items to Restore box, select the check box for the VM with files or folders that you want to restore.
10. In the Encryption Password box, enter the data encryption password. To view the password hint, click the Hint button.
11. In the Idle Time box, enter the number of minutes of inactivity after which the shared drive will automatically unshare. The Idle time can range from 2 to 180 minutes.
Note: The drive will not unshare as long as new data is being copied. If you copy the same data from a shared drive more than once, the system could time out because no new data is being read.
12. To use all available bandwidth for the restore, select Use all available bandwidth.
13. Click Run Restore.
Volumes from the selected VM are mapped as drives on the machine where the VRA is running, and are available in a RestoreMount folder on the VRA machine.
14. On the machine where the VRA is running, do one of the following:
•Copy files and folders that you want to restore from the mapped drives.
•Share one or more mapped drives with other users. Users can then access the UNC share, and copy files and folders that they want to restore.
•Share one or more directories from the RestoreMount folder on the VRA machine. Users can then access the UNC share, and copy files and folders that they want to restore.