After a Windows computer with the SQL Server Plug-in is added and configured in Portal, you can create a backup job for one or more databases in a SQL Server instance. The backup job specifies which database or databases to back up, and where to save the backup data. A SQL Server Plug-in job cannot include databases from multiple SQL Server instances.
You can also back up a SharePoint 2013 or 2010 database with a SQL Server Plug-in job.
When you create a SQL Server database backup job, you must specify Windows administrator or SQL Server administrator credentials that allow the Agent to connect to the instance where you are backing up databases.
To back up the data, you can run the backup job manually or schedule the job to run. When scheduling or running a job, you can specify whether to back up the database, the transaction logs, or both. See Run and schedule backups, synchronizations and custom commands.
From the backup, you can restore an entire database. You can also use a Granular Restore application to restore specific items from the database. See Restore items from a SQL Server or SharePoint database.
To add a SQL Server database backup job:
1. On the navigation bar, click Computers.
The Computers page shows registered computers.
2. Find a Windows computer with the SQL Server Plug-in, and expand its view by clicking the computer row.
3. Click the Jobs tab.
If a valid vault connection is not available for the computer, you cannot access the Jobs tab.
4. In the Select Job Task menu, click Create New SQL Server Job.
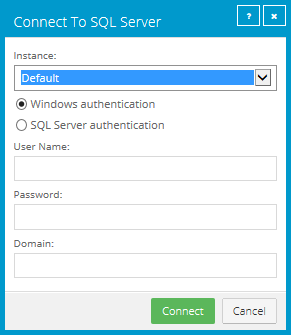
5. In the Connect to SQL Server dialog box, specify the following information:
•In the Instance list, select the SQL Server instance where you want to back up databases.
•To connect to the instance using a Windows administrator account, select Windows authentication.
•To connect to the instance using a SQL Server administrator account, select SQL Server authentication.
•In the User Name box, type the user name for connecting to the instance.
•In the Password box, type the password of the specified user.
•If you selected Windows authentication, in the Domain box, type the domain of the specified account.
6. Click Connect.
7. In the Create New Job dialog box, specify the following information:
•In the Name box, type a name for the backup job.
•In the Description box, optionally type a description for the backup job.
•In the Destination list, select the vault where you want to save the backup data.
A vault only appears in the list if it assigned to the user, or if the user added it on the computer’s Vault Settings tab.
•In the Log File Options list, select the level of detail for job logging. For more information, see Log file options|tag=Log file options.
•For new backup jobs, the encryption method is AES 256 bit. Existing jobs can have other encryption methods. See Encryption settings|tag=Encryption settings.
•In the Password and Confirm Password boxes, enter an encryption password. You can also enter a password hint in the Password Hint box.

8. In the Select Databases for Backup box, do one or more of the following to add databases to the backup job:
•To add specific databases to the backup job, select the check box for each database, and then click Include. The included databases appear in the Backup Set box.
•To back up all databases in the selected SQL Server instance, select the check box for the instance, and then click Include. The included instances appear in the Backup Set box.
Note: When the job runs, newly-added databases in the selected instance are automatically backed up.
•To back up databases with names that match a filter when the job runs, select the check box for the SQL Server instance, and then click Include. An inclusion record with an asterisk (*) appears in the Backup Set box.
In the Database Filter box, enter the names of databases to include. Separate multiple names with commas, and use asterisks (*) and question marks (?) as wildcard characters. For example, to back up databases with names that end with “Management” or include the word “database” followed by a single character, enter the following filter: *management, database?
Note: If filter fields do not appear, you must upgrade the Agent on the computer to a version that supports database filtering.
Note: Filters are applied when the backup job runs. New databases that match the specified filters are automatically backed up when the job runs.
Note: Filters are not case-sensitive.
9. To exclude databases from the backup job, do one or more of the following in the Select Databases for Backup box:
•To exclude specific databases from the backup job, select the check box for each database, and then click Exclude. The excluded databases appear in the Backup Set box.
•To exclude databases with names that match a filter when the backup job runs, select the check box for the SQL Server instance, and then click Exclude. A record with an asterisk (*) appears in the Backup Set box.
In the Database Filter box, enter the names of databases to exclude. Separate multiple names with commas, and use asterisks (*) and question marks (?) as wildcard characters. For example, to exclude databases if their names begin with “M”, enter the following filter: m*
Note: If filter fields do not appear, you must upgrade the Agent on the computer to a version that supports database filtering.
Note: Filters are applied when the backup job runs. New databases that match the specified filters are automatically excluded when the backup job runs.
Note: Filters are not case-sensitive.
10. To remove an
inclusion or exclusion record from the Backup Set box, click the Delete
button beside the record. 
11. Click Apply Now to consolidate and simplify records in the Backup Set box, if changes need to be applied.
12. Click Create Job.
The job is created, and the View/Add Schedule dialog box appears. You can now create a schedule for running the backup. See Run and schedule backups, synchronizations and custom commands.
Click Cancel if you do not want to create a schedule at this time.