
The Linux Agent is available as a 64-bit application and a 32-bit application. The 64-bit version of the Linux Agent can only be installed on 64-bit systems. The 32-bit version of the Linux Agent can only be installed on 32-bit systems.
The usrlibacl.so.1 shared library is required and must be installed on the protected system.
To run the installation kit, you must have root privileges.
The Linux Agent installation kit is provided as a tar.gz file. Only unzip this file on the machine where it will be installed. Unzipping the file on another type of machine can cause unpredictable results.
•A target system running a supported version of Linux. For supported platforms, see the Linux Agent release notes.
•Root privileges on the target system are required to install the Agent.
•Sufficient disk space for the new installation, and later job activities. The installation program will determine whether there is enough disk space for the installation to continue. If the available disk space is insufficient, the installation directory will roll back to its original state.
To install the Agent:
1. Download the 64-bit or 32-bit Linux Agent tar.gz installation kit on the machine where you are installing the Agent.
Note: Download the correct installation kit for your system. You can only install the 64-bit Linux Agent on a 64-bit system, and you can only install the 32-bit Linux Agent on a 32-bit system.
2. Extract files from the installation package. To do so, run the following command:
tar -zxf packageName.tar.gz
Where packageName is the name of the Agent installation kit.
The following screenshot shows files that are extracted to the Linux Agent folder.
3. Run the following command to start the installation:
./install.sh
For available options for this command, see Install the Linux Agent in silent mode.
4. Press Enter to specify the default installation directory.
The directory, disk space required and available disk space are shown.
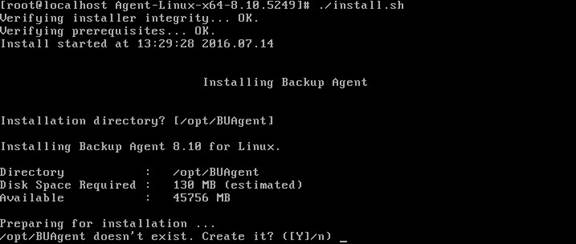
5. If you are prompted to create the installation directory, enter Y.

6. At the Select language prompt, enter the language for Agent messages. The default language is English [en-US].
7. At the Register to Portal prompt, enter Y.
8. At the Portal address prompt, enter the Portal address.
9. At the Portal connection port prompt, enter the Portal connection port. The default value is 8086.
10. At the Portal username prompt, enter the Portal username for registering the Agent.
11. At the Portal password prompt, enter the password for the Portal user specified in Step 11.

The next step in the installation is to choose the encryption method. By default, the Agent encrypts data using an encryption method that is integrated in the Agent. For audit purposes, some organizations require the Agent to use an external encryption library that is provided with the Agent. Using the external encryption library can degrade Agent performance.

12. Do one of the following:
•To use the integrated encryption method, enter A. This is the default value.
•To use the external encryption library that is provided with the Agent, enter B.
The installation proceeds. When complete, a message appears, and the Agent daemon will be running.
After installation, the installation log (Install.log) is located in the installation directory.
