After a Windows computer with the Image Plug-in is added and configured in Portal, you can create an Image backup job. The Image Plug-in sequentially backs up all blocks on a volume instead of backing up specific files and folders. Because this process can require less processing than a traditional Windows backup job, the backup time can be significantly reduced.
In an Image backup job, you can select the following options:
•Specific volumes to back up
•Bare Metal Restore (BMR). This option backs up volumes that are needed to boot up the system after a system recovery. A BMR backup includes the volume where the operating system is installed, and the EFI system partition (ESP) on a UEFI-based system or the volume with the master boot record (MBR) on a BIOS-based system. In a disaster recovery situation, you can use the System Restore application to restore systems from BMR backups.
Note: BMR backup jobs can also be created using the Windows Agent without the Image Plug-in. Regardless of how a BMR backup was created, you can restore the backup using the System Restore application.
•Volumes with SQL Server database files. This option creates application-consistent SQL Server database backups, so that separate SQL Server Plug-in jobs are not required. Image Plug-in version 7.5 or later is required for this functionality.
After creating an Image backup job, you can run the job manually, and schedule the backup job to run. See Run and schedule backups, synchronizations and custom commands.
In a seed backup, the Image Plug-in processes data for every block on a volume— even blocks that are empty. The amount of data reported in the backup log for a seed backup could be larger than the amount of data actually on the volumes.
Note: If the Image Plug-in was installed silently, the machine must be restarted before Changed Block Tracking (CBT) can identify data that has changed since a previous backup. Without CBT, the Agent reads all data on a volume before backing up the changed blocks. See Install or upgrade the Windows Agent and plug-ins in silent mode.
To add an Image backup job:
1. On the navigation bar, click Computers.
The Computers page shows registered computers.
2. Find a Windows computer with the Image Plug-in, and click the computer row to expand its view.
If a backup job has not been created for the computer, the system can attempt to create a backup job automatically. However, this job will not use the Image Plug-in. To create an Image backup job, click Configure Manually. To automatically create a default Windows Agent backup job for the computer, click Auto Configure. See Add the first backup job for a Windows computer.
3. Click the Jobs tab.
If a valid vault connection is not available for the computer, you cannot access the Jobs tab. You must add a vault connection before you can create a job. See Add vault settings.
4. In the Select Job Task menu, click Create New Image Job.
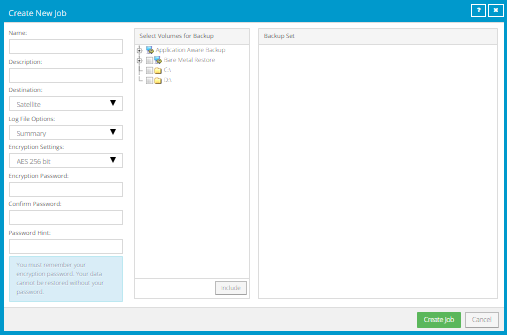
5. In the Create New Job dialog box, specify the following information:
•In the Name box, type a name for the backup job.
•In the Description box, optionally type a description for the backup job.
•In the Destination list, select the vault where you want to save the backup data.
A vault only appears in the list if it assigned to the user, or if the user added it on the computer’s Vault Settings tab.
•In the Log File Options list, select the level of detail for job logging. For more information, see Log file options|tag=Log file options.
•For new backup jobs, the encryption method is AES 256 bit. Existing jobs can have other encryption methods. See Encryption settings|tag=Encryption settings.
•In the Password and Confirm Password boxes, enter an encryption password. You can also enter a password hint in the Password Hint box.
Note: For Image Plug-in jobs, the selected logging level does not affect the content of the logs.
6. In the Select Volumes for Backup box, do one of the following until the Backup Set box shows the volumes that you want to back up:
•To back up specific volumes, select the check box for each volume that you want to back up, and then click Include.
•To back up volumes that are needed to boot up the system after a system recovery, select the Bare Metal Restore check box, and then click Include.
Note: In addition to restoring systems from Bare Metal Restore (BMR) backups using the System Restore application, you can restore specific volumes, files, and folders from BMR backup jobs created using the Image Plug-in.
•To back up volumes with SQL Server database files, and create application-consistent SQL Server database backups, click Application Aware Backup, and then select the SQL Volumes Protected check box.
7. Click Create Job.
The job is created, and the View/Add Schedule dialog box appears. You can now create a schedule for running the backup. Click Cancel if you do not want to create a schedule at this time.
For information about how to run and schedule the backup job, see Run and schedule backups, synchronizations and custom commands.