Before a computer can back up data to or restore data from a vault, vault settings must be added for the computer. Vault settings provide vault information, credentials, and Agent connection information required for accessing a vault.
When adding vault settings for a computer, Admin users and regular users can manually enter vault information, or select a vault profile with vault information and credentials. See Add a vault profile for a site.
If a policy is assigned to a computer, Admin users can select any vault profile from the policy. Regular users can only select policy vault profiles that are also assigned to them. See Assign vault profiles to a user.
If a policy is not assigned to a computer, Admin users can select any vault profile in the site. Regular users can only select vault profiles that are assigned to them.
In previous Portal versions, you could specify whether data is encrypted using AES encryption when it is transmitted to and from the vault. Over-the-wire encryption is now automatically enabled when you add vault settings or save existing vault settings.
When an E2 appliance reports a new IP address, the IP address is updated in Portal vault settings for Agents that are registered to the E2, and in the E2 vault profile. Agent versions 8.10 and later contact Portal to check for vault IP address changes. If a Super user or Admin user changes the name of an E2 vault profile, the name is updated automatically in vault settings for Agents that are registered to the E2.
To add vault settings:
1. On the navigation bar, click Computers. The Computers page shows registered computers.
2. Find the computer for which you want to add vault settings, and click the computer row to expand its view.
3. On the Vault Settings tab, click Add Vault.
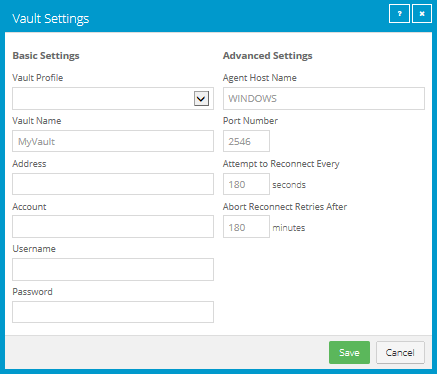
The Vault Settings dialog box appears.
4. Do one of the following:
•In the Vault Name box, enter a name for the vault. In the Address box, enter the vault host name or IP address. In the Account, Username, and Password boxes, enter an account and credentials for backing up data to and restoring data from the vault.
Specifying the host name of the vault is recommended. This will allow DNS to handle IP address changes.
•Click the Vault Profile box. If one or more vault profiles appear, click the vault profile that you want to add for the computer. Vault information and credentials are then populated in the Vault Settings dialog box.
If a policy is assigned, the Vault Profile list includes vault profiles from the policy. If a policy is not assigned, the list includes vault profiles from the site. For a regular user, the list only includes vault profiles that are also assigned to the user.
5. (Optional) Change one or more of the following Advanced Settings for the vault connection:
•Agent Host Name. Name to use for the computer on the vault. For a Hyper-V environment, by default, the name is the fully qualified domain name of the cluster or standalone host.
•Port Number. Port used to connect to the vault. The default port is 2546.
•Attempt to Reconnect Every. Specifies the number of seconds after which the Agent should try to connect to the vault, if the vault becomes unavailable during a backup or restore.
•Abort Reconnect Retries After. Specifies the number of times the Agent tries to reconnect to the vault, if the vault becomes unavailable during a backup or restore. If the Agent cannot connect to the vault successfully in the specified number of tries, the backup or restore fails.
6. Click Save.