After adding a Windows computer in Portal, you can create a backup job that protects files and folders on UNC shares. The backup job specifies which folders and files to back up and where to save the data. You must also provide credentials for accessing the UNC share.
To back up the data, you can run the backup job manually or schedule the backup job to run. See Run and schedule backups, synchronizations and custom commands.
To add a UNC file backup job:
1. On the navigation bar, click Computers.
The Computers page shows registered computers.
2. Find a Windows computer, and expand its view by clicking the computer row.
If a backup job has not been created for the computer, the system can attempt to create a backup job automatically. However, this job only backs up local files. See Add the first backup job for a Windows computer.
3. Click the Jobs tab.
If a valid vault connection is not available for the computer, you cannot access the Jobs tab. See Add vault settings.
4. In the Select Job Task list, click Create New UNC Files Job.
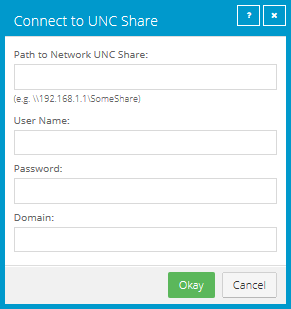
5. In the Connect to UNC Share dialog box, specify the following information:
•In the Path to Network UNC Share box, type the name of the UNC share where you want to back up files (e.g., \\server\share).
•In the User Name box, type the name of a user who has access to the UNC share.
•In the Password box, type the password of the specified user.
•In the Domain box, type the domain of the specified user account.
6. Click Okay.
The system validates the UNC path and credentials. If the UNC path or credentials are not valid, a message appears. You must reenter information in the dialog box and click Okay again.
7. In the Create New Job dialog box, specify the following information:
•In the Name box, type a name for the backup job.
•In the Description box, optionally type a description for the backup job.
•In the Destination list, select the vault where you want to save the backup data.
A vault only appears in the list if it assigned to the user, or if the user added it on the computer’s Vault Settings tab.
•In the Log File Options list, select the level of detail for job logging. For more information, see Log file options|tag=Log file options.
•For new backup jobs, the encryption method is AES 256 bit. Existing jobs can have other encryption methods. See Encryption settings|tag=Encryption settings.
•In the Password and Confirm Password boxes, enter an encryption password. You can also enter a password hint in the Password Hint box.
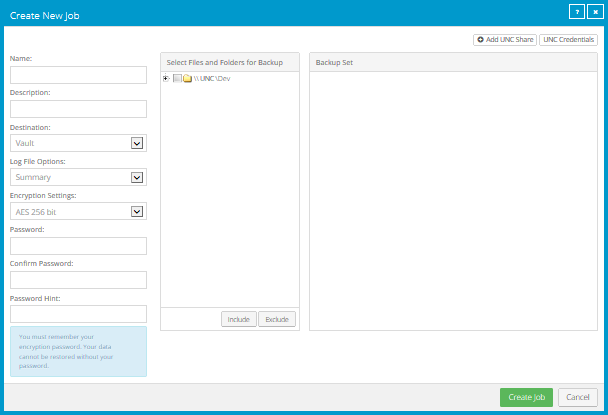
8. In the Select Files and Folders for Backup box, do one or more of the following until the Backup Set box shows the folders and files that you want to include or exclude:
•To add one or more folders or files to the backup job, select the check box for each folder or file, and then click Include. The included folders or files appear in the Backup Set box. If you include a folder, the backup job includes all of the folder’s subdirectories and files by default. If you do not want to back up all of the subdirectories and files, you can add filters. See Filter subdirectories and files in backup jobs.
•To exclude one or more folders or files from the backup job, select the check box for each folder or file, and then click Exclude. The excluded folders or files appear in the Backup Set box. If you exclude a folder, all of the folder’s subdirectories and files are excluded from the backup job by default. If you do not want to exclude all of the subdirectories and files, you can add filters. See Filter subdirectories and files in backup jobs.
•To remove an inclusion or exclusion record from the Backup Set
box, click the Delete button beside the folder or file record. 
Click Apply Now to consolidate and simplify records in the Backup Set box, if changes need to be applied.
9. Click Create Job.
The job is created, and the View/Add Schedule dialog box appears. Now you can create a schedule for running the backup. Click Cancel if you do not want to create a schedule at this time.
For information about how to run and schedule the backup job, see Run and schedule backups, synchronizations and custom commands.