When adding or editing a Hyper-V backup job, you can create a schedule for running the job, and enable or disable the schedule. You can also edit existing schedules.
You can specify a retention type for each schedule. The retention type specifies the number of days a backup is kept on the vault, how many copies of a backup are stored online, and how long backup data is stored offline. See Add retention types.
You can create complex schedules for a Hyper-V backup job by creating multiple schedules. For example, you can schedule a backup job to run at midnight every Friday, and schedule the job to run at 8 pm on the first day of every month. To create multiple schedules, repeat the following procedure for each schedule.
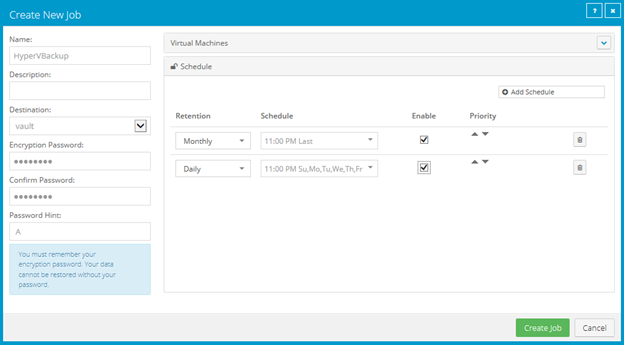
If a job is scheduled to start at exactly the same time by multiple schedules, the job only runs once at the scheduled time. If the jobs have different retention types, the retention type of the schedule that is highest in the list is applied to the resulting safeset. For example, in the following screenshot, the job is scheduled to run at 11 PM on the last day of the month with the Monthly retention type, and every night at 11 PM with the Daily retention type. On the last day of each month, the job runs only once at 11 PM. Because the schedule with the Monthly retention type is higher in the list than the schedule with the Daily retention type, the Monthly retention type is applied to the safeset.
Note: If a job is scheduled to run at slightly different times, the Agent attempts to run the job according to each schedule. For example, if a job is scheduled to run at 11 PM by one schedule and 11:01 PM by another schedule, the Agent will attempt to run the job twice. Try to avoid overlapping schedules; problems can occur if a job is scheduled to run twice in a short period of time.
Note: You cannot defer scheduled Hyper-V backups. Hyper-V Agent backups can only be deferred when they are run manually (ad hoc). See Run an ad-hoc backup.
To add or edit a schedule for a Hyper-V backup job:
1. In the Create New Job or Edit Job dialog box, while adding or editing a Hyper-V backup job, click Schedule.
2. In the Schedule box, do one of the following:
•To add a schedule, click Add Schedule.
•To edit a schedule, find the schedule that you want to edit.
3. In the schedule row, select a retention type.
A retention type specifies the number of days a backup is kept on the vault, how many copies of a backup are stored online, and how long backup data is stored offline.
4. In the Schedule box, click the arrow.
The Configure Job Schedule dialog box opens.
5. In the Configure Job Schedule dialog box, do one of the following:
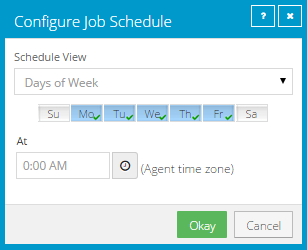
•To run the backup on specific days each week, click Days of Week in the Schedule View list. Select the days when you want to run the job. Use the At field to specify the time when you want to run the job each day. Click Okay.
•To run the backup on specific dates each month, click Days of Month in the Schedule View list. On the calendar, select the dates when you want to run the job. Use the At field to specify the time when you want to run the job on each date. Click Okay.

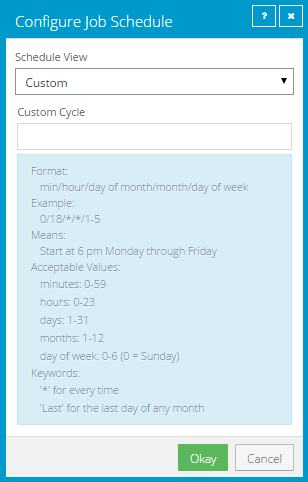
•To create a custom schedule, click Custom in the Schedule View list. In the Custom Cycle box, enter a custom schedule. Follow the format and notation described in the dialog box. Click Okay.
The new or revised schedule appears in the Schedule box.
6. To enable the schedule to run, select Enable. To disable the schedule so it does not run, clear Enable.
7. To remove the
schedule, click Delete Schedule. 
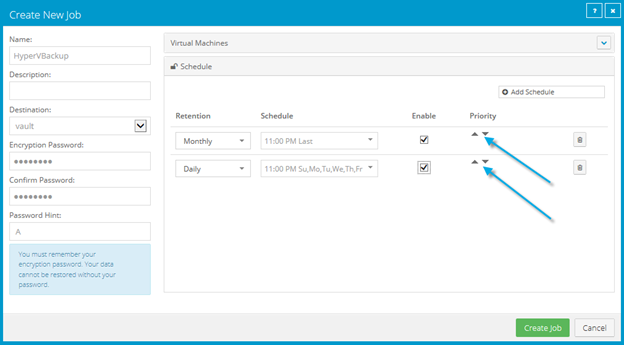
8. If there is more than one schedule row, you can use the Priority arrows to move a schedule higher or lower in the list. Schedules that are higher in the list have higher priority than schedules lower in the list. If a job is scheduled to run at the same time by multiple schedules, the job only runs once at the scheduled time. If the schedules have different retention types, the job only runs with the retention type of the schedule that is highest in the list.
9. Click Save.