After a backup job is created, you can run the backup at any time, even if the job is scheduled to run at specific times.
To run an ad-hoc backup:
1. On the navigation bar, click Computers.
A grid lists available computers.
2. Find the computer with the backup job that you want to run, and expand its view by clicking the computer row.
3. Click the Jobs tab.
4. Find the job that you want to run, and click Run Job in its Select Action menu.
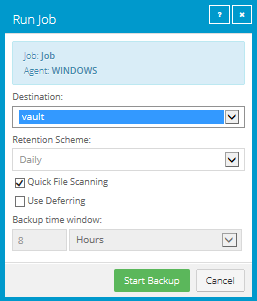
The Run Job dialog box shows the default settings for the backup.
Note: Beginning at this point, you can click Start Backup to immediately start the job. If you prefer, you can change backup options before running the job.
5. To back up the data to the vault specified in the job, do not change the Destination.
To back up the data to SSI (safeset image) files on disk, select Directory on Disk from the Destination list. Click the Browse button. In the Select Folder dialog box, choose the location where you want to save the SSI files, and click Okay.
SSI files are full backups saved to disk instead of to a vault. Saving backup files on physical media and transporting them to a remote vault for importing can be quicker than backing up data directly to a vault in a remote datacenter.
Note: Backups to SSI files on disk cannot be deferred.
6. In the Retention Scheme list, click a retention type.
The retention type specifies the number of days a backup is kept on the vault, how many copies of a backup are stored online, and how long backup data is stored offline. See Add retention types.
7. If you are backing up a SQL Server database using the SQL Server Plug-in, do one of the following:
•To back up the database, click Full. To also back up the database’s transaction logs, select Include transaction logs.
•To back up transaction logs only, click Transaction Log. When Transaction Log is selected, the database and its transaction logs will be backed up when the backup first runs. In subsequent backups, only the transaction logs will be backed up.
Note: After a transaction log backup, logs are marked for truncation. If you also back up databases using another tool (e.g., native SQL Server backup), use only one tool for truncating logs.
Note: Transaction logs can only be backed up for databases that use the full or bulk-logged recovery model.
8. If you are backing up volumes with SQL Server database files using the Image Plug-in, do one of the following:
•To truncate database transaction logs after the backup, select Truncate transaction logs.
•To run the backup without truncating logs, clear Truncate transaction logs.
Note: If you also back up databases with another tool (e.g., native SQL Server backup), use only one tool for truncating logs.
9. If you are backing up an Exchange database, do the following:
•In the Backup Type list, do one of the following:
•To only back up transaction logs and the checkpoint file after the first “seed” backup, click Incremental.
•To back up the database files, checkpoint file and transaction logs, click Full.
For more information, see Plan Full and Incremental Exchange backups.
•To validate Exchange data during the backup, select Validate Exchange database.
10. If the Quick File Scanning option is available, and you want to enable it, select the Quick File Scanning check box.
Quick File Scanning (QFS) reduces the amount of data read during the backup process. Any file streams that have not changed since the last backup are skipped. Without QFS, files are read in their entirety. Note that changes in delta-file format might cause QFS to be temporarily disabled during the first backup following an upgrade. This could cause this first backup to take longer than usual.
Note: QFS is not used for vSphere Agent backups. Instead, the Agent uses CBT (Changed Block Tracking) to identify disk sectors that have changed.
11. Do one of the following:
•To allow the backup job to run without a time limit, clear the Use Deferring check box.
•To specify a maximum amount of time that the backup job can run, select the Use Deferring check box. From the Backup time window list, select Minutes or Hours. In the adjacent box, type the maximum number of minutes or hours that the job can run.
Note: When deferring is used, the backup job does not back up any new data after the specified amount of time, even if some data is not backed up. Changes to data that was previously backed up will be backed up, regardless of the backup time window.
Note: The Use Deferring check box is not available if you are backing up data to SSI (safeset image) files on disk.
Note: Incremental backups for Exchange cannot be deferred, even if deferring is enabled. Deferring can be applied to full backups for Exchange.
12. Click Start Backup.
The Process Details dialog box shows the backup progress, and indicates when the backup is completed. Other recent job processes might also be listed in the dialog box. See View current process information for a job.
13. If you want to stop the backup, click Stop.
14. To close the Process Details dialog box, click Close.