You can schedule custom commands to run on Windows and Linux computers. Custom commands are scripts that are saved on a computer where an Agent is installed, and are scheduled to run through Portal. For example, you could schedule a custom command that shuts down services on the Agent computer, runs a backup, and then restarts the services.
Scripts can be in .bat, .exe, .cmd and .sh format, and must be saved in the following directory on the protected computer: <AgentInstallationDirectory>\ScheduleScripts
To schedule a custom command:
1. On the navigation bar, click Computers.
The Computers page shows registered computers.
2. Find the computer with the custom command, or script, that you want to schedule. Expand its view by clicking its row.
3. Click the Jobs tab.
4. In the Select Job Task menu, click Create New Custom Command.
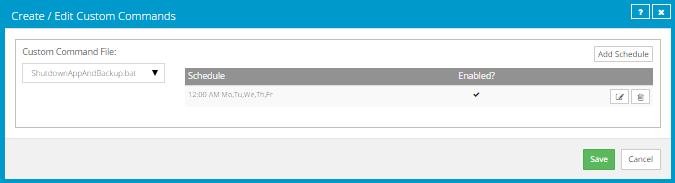
The Create / Edit Custom Commands dialog box appears. The Custom Command File list shows scripts in the <AgentInstallationDirectory>\ScheduleScripts directory that have not been scheduled.
5. In the Custom Command File list, click the script that you want to schedule.
Command files in the list include .bat, .exe, .cmd and .sh files that have not been scheduled and are saved on the protected computer in the following directory: <AgentInstallationDirectory>\ScheduleScripts
A default schedule for the command appears in the Schedule area.
6. Do one or more of the following:
•To add a schedule, click Add Schedule, and then do one of the following:
•To run the backup on specific days each week, click Weekly in the Schedule View list. Select the days when you want to run the job. Use the At field to specify the time when you want to run the job, and then click Confirm.
•To run the backup on specific dates each month, click Days of Month in the Schedule View list. On the calendar, select the dates when you want to run the job. Use the At field to specify the time when you want to run the job, and then click Confirm.
•To create a custom schedule, click Custom in the Schedule View list. In the Custom Cycle box, enter a custom schedule using the syntax described in the dialog box. Click Confirm.
•To edit a schedule, click the schedule’s Edit Schedule button.  Change the Schedule View, Run
on and At values, and then click Confirm.
Change the Schedule View, Run
on and At values, and then click Confirm.
•To disable a schedule, click the schedule’s Edit Schedule button. Clear the Enable option, and
then click Confirm.
•To enable a schedule, click the schedule’s Edit Schedule button. Select the Enable option, and
then click Confirm.
•To delete a schedule, click the schedule’s Delete Schedule button. 
7. To change the priority order of multiple schedules, click the Priority arrows to change the order of the schedule rows. Schedules higher in the list have a higher priority than schedules lower in the list.
If a command is scheduled to run at the same time by multiple schedules, the job only runs once at the scheduled time.
8. Click Save.