When a Windows computer has more than one UNC backup job, you can search for and restore files from multiple UNC jobs at the same time. This functionality is available for computers where Windows Agent version 8.0 or later is installed.
You can restore files from UNC jobs to a local folder or to a UNC share. When you restore files to a UNC share, files are only restored from UNC jobs with credentials that have access to the share. If required, you can change the credentials in a UNC backup job until you have restored the files.
To restore files from multiple UNC jobs:
1. On the navigation bar, click Computers.
A grid lists available computers.
2. Find a Windows computer with multiple UNC jobs, and expand its view by clicking the computer row.
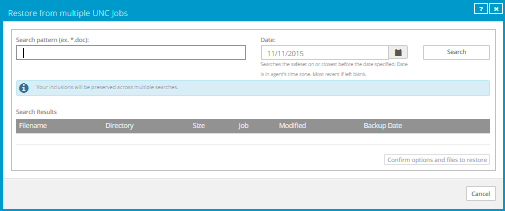
3. In the Select Job Task menu, click Restore from multiple UNC jobs.
The Restore from multiple UNC jobs dialog box appears.
5. Do one of the following:
•To search for files in the most recent safeset for each UNC job, leave the Date box blank.
•To search for files in safesets with a specific date, click the calendar
button.  In the calendar that
appears, click the date.
In the calendar that
appears, click the date.
If a job does not have a safeset for the specified date, the system searches for files in the safeset with the date that is closest to and before the specified date.
If a job includes multiple safesets for the specified date, the system searches for files in the last safeset on the date.
6. Click Search.
Files found in the safesets are listed in the lower part of the dialog box.
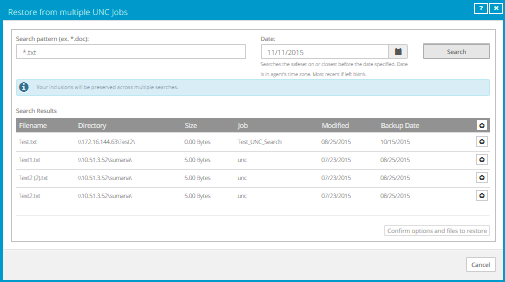
•To restore specific files, click the Include for restore button
for each file. 
•To restore all files in the list, click the Include All button at
the top of the file list.
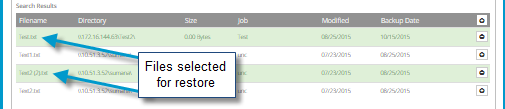
After a file is selected for restore, the file is highlighted in the list.
8. To search for more files to restore, repeat Steps 4 to 7.
9. To view all files that are selected for restore, click Confirm options and files to restore.
The Restore from multiple UNC jobs dialog box shows files that are selected for restore.
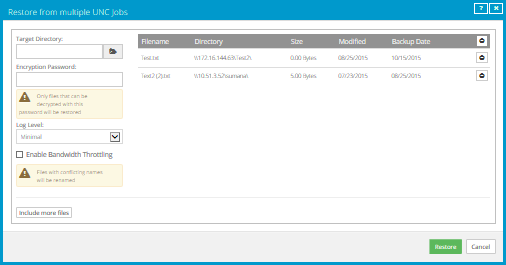
10. To select more files to restore, click Include more files. The Restore from multiple UNC jobs dialog box returns. Repeat Steps 4 to 9.
11. To restore the selected files, do the following:
a. In the Target Directory box, do one of the following:
•To select a local folder as the restore destination, click the Browse
button.  In the Select Folder
dialog box, choose the folder and then click Okay.
In the Select Folder
dialog box, choose the folder and then click Okay.
•To specify a local folder or UNC share as the restore destination, type the name of the folder or UNC share (e.g., \\server\share) where you want to restore files.
If the destination is a UNC share, files will only be restored from jobs with credentials that have access to the share. If required, you can change credentials in a UNC backup job until you have restored the files.
If the restore destination folder does not exist, it will be created during the restore.
b. In the Encryption Password box, enter the encryption password.
If you are restoring files from UNC jobs with different encryption passwords, files will only be restored from jobs with the password specified in this box.
c. In the Log Level list, click the level of detail for logging. See Advanced restore options.
d. To restrict the amount of bandwidth used, select the Enable Bandwidth Throttling check box. See Advanced restore options.
e. Click Restore.
The selected files are restored. If you restore a file with the same name as another file in the same location, a numeric extension (e.g., .0001) is added to the restored file name (e.g., filename.txt.0001).