After backing up volumes on a Windows computer using the Image Plug-in, you can restore volumes from the backup to selected live volumes (target volumes).
IMPORTANT: When you restore a volume from a backup, any data on the target volume will be lost.
A target volume must meet the following requirements:
•The target volume must be as large as or larger than the volume that was backed up.
•The Windows operating system cannot be installed on the target volume.
•The Windows Agent cannot be installed on the target volume.
After a restore, the system considers the target volume to be the size of the volume that was restored. For example, after you restore a 1 TB volume to a 2 TB target volume, the system sees the target as a 1 TB volume. Any remaining space on the target volume will not be usable.
To restore Windows volumes from an Image backup:
IMPORTANT: Before restoring volumes from an Image backup, stop any services on the system that are using the target volume (e.g., SQL Server or Exchange services). Restart the services after the restore is completed.
1. On the navigation bar, click Computers.
A grid lists available computers.
2. Find the Windows computer with the Image Plug-in, and expand its view by clicking the computer row.
3. Click the Jobs tab.
4. Find the Image backup job with volumes that you want to restore, and click Restore in the job’s Select Action menu.
Note: You can restore volumes from regular or Bare Metal Restore backups created using the Image Plug-in.
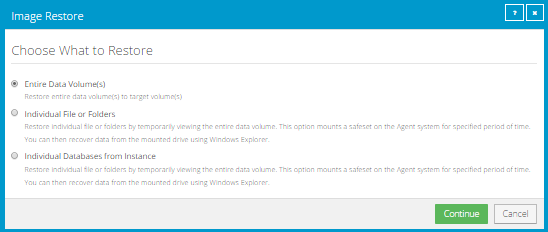
5. In the Image Restore dialog box, select Entire Data Volume(s), and then click Continue.
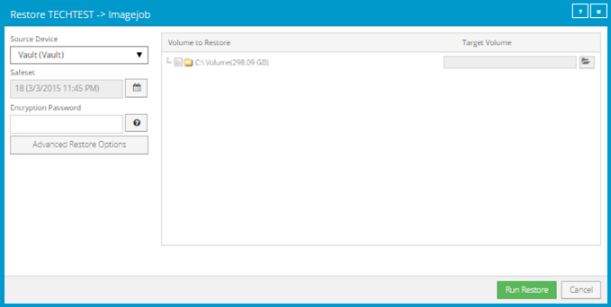
The Restore dialog box shows volumes that can be restored from the backup. The most recent safeset for the job appears in the Safeset box.
6. To restore data from an older safeset, or from SSI (safeset image) files, do one of the following:
•To restore data from an older safeset, click the calendar button.  In the calendar that appears, click the
date of the safeset from which you want to restore. To the right of the
calendar, click the specific safeset that you want to use.
In the calendar that appears, click the
date of the safeset from which you want to restore. To the right of the
calendar, click the specific safeset that you want to use.
•To restore data from SSI (safeset image) files on disk, select
Directory on disk from the Source Device list. Click the folder
button.  In the Select
Folder dialog box, select the directory where the files are located, and
click Okay.
In the Select
Folder dialog box, select the directory where the files are located, and
click Okay.
SSI files are full backups exported from the vault or backed up to disk instead of to a vault. It can be quicker to save backup files on physical media and transport them to a location for a restore, than to restore data from a vault in a remote datacenter.
Note: If SSI files were created by a backup to a directory on disk, you cannot restore from the SSI files until they have been imported into the vault and you have synchronized the Agent with the vault.
7. In the
Encryption Password box, enter the encryption password. To view the
password hint, click the Hint button. 
8. To change the log detail level or bandwidth options, click Advanced Restore Options. Specify settings in the Advanced Restore Options dialog box, and click Okay. See Advanced restore options.
9. In the Volume to Restore column, select each volume that you want to restore.
10. For each selected volume, do the following to choose the live volume where it will be restored:
IMPORTANT: Data on the selected volume will be lost when the backed-up volume is restored.
a. Click the
folder icon. 
The Select Volume dialog box lists all live volumes on the computer. If you cannot restore the selected volume to a specific live volume (e.g., because the live volume is too small, contains the Windows operating system, or contains Windows Agent software), the volume is unavailable and cannot be clicked.
b. Click the volume where you want to restore the backed up volume.
c. Click Okay.
11. Click Run Restore.
The Process Details dialog box shows the restore progress and indicates when the restore is completed. The target volume goes offline until the backed-up volume is restored.
Other recent job processes might also be listed in the dialog box. See View current process information for a job.
12. To close the Process Details dialog box, click Close. If the restore is running, it will continue to run.