
After a VMware vSphere environment is added in Portal, you can create a backup job that specifies which virtual machines (VMs) to back up, and where to save the backup data.
YTo back up the data, you can run the backup job manually or schedule the backup job to run. See Run and schedule backups, synchronizations and custom commands.
To add a vSphere backup job:
1. On the navigation bar, click Computers.
The Computers page shows registered computers and environments.
2. Click the
vSphere environment row.
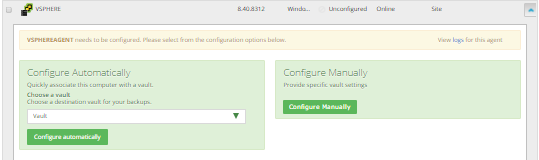
If the vSphere environment does not have vault settings, the Configure Manually box appears. To add vault settings manually, click Configure Manually, and add a vault on the Vault Settings tab. See Add vault settings.
If the vSphere environment does not have vault settings and at least one vault profile is available, the Configure Automatically box appears. To add vault settings, choose a vault from the Choose a vault list. If the Assign the computer to a site list appears, you can also choose a child site for the computer. Click Configure Automatically.
3. Click the Jobs tab.
4. In the Select Job Task menu, click Create New VMware vCenter Job.
If the Connect to vCenter dialog box appears, specify the following information in the dialog box:
•In the User Name box, type the Windows domain account user name used to authenticate the vSphere Agent with the vCenter server.
•In the Password box, type the password for the specified user.
•In the Domain box, type the domain of the specified user account. The domain is optional if you specified the domain in the User Name box (e.g., domain\username).
Note: vCenter settings entered in this dialog box are populated on the Agent’s vCenter Settings tab.
5. In the Create New Job dialog box, specify the following information:
•In the Name box, type a name for the backup job.
•In the Description box, optionally type a description for the backup job.
•In the Destination list, select the vault where you want to save the backup data.
A vault only appears in the list if it assigned to the user, or if the user added it on the computer’s Vault Settings tab.
•In the Log File Options list, select the level of detail for job logging. For more information, see Log file options|tag=Log file options.
•For new backup jobs, the encryption method is AES 256 bit. Existing jobs can have other encryption methods. See Encryption settings|tag=Encryption settings.
•In the Password and Confirm Password boxes, enter an encryption password. You can also enter a password hint in the Password Hint box.
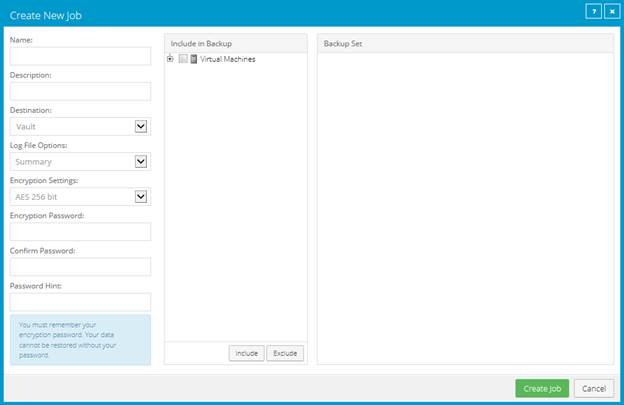
6. In the Include in Backup box, do one or more of the following until the Backup Set box shows the VMs that you want to include and exclude in the backup job:
•To add specific VMs to the backup job, select the check box for each VM, and then click Include.
•To exclude specific VMs from the backup job, select the checbox for each VM, and then click Exclude.
•To add VMs to the backup job by name, select the Virtual Machines check box, and then click Include. In the Filter field, enter names of VMs to include. Separate multiple names with commas, and use asterisks (*) as wildcard characters. For example, to include VMs in a backup if their names end with “x64” or start with “SQL”, enter the following filter: *x64, SQL*
Note: Asterisks (*) are the only supported wildcards in filter fields.
•To exclude VMs from the backup job by name, select the Virtual Machines check box, and then click Exclude. In the Filter field, enter names of VMs to exclude. Separate multiple names with commas, and use asterisks (*) as wildcard characters. For example, to exclude VMs from a backup if their names start with “test” or end with “x32”, enter the following filter: test*, *x32
•To remove an inclusion or exclusion record from the Backup Set
box, click the Delete button beside the record. 
Click Apply Now to consolidate and simplify records in the Backup Set box, if changes need to be applied.
7. Click Create Job.
The job is created, and the View/Add Schedule dialog box appears. Now you can create a schedule for running the backup. Click Cancel if you do not want to create a schedule at this time.
For information about how to run and schedule the backup job, see Run and schedule backups, synchronizations and custom commands.