When agent software is first installed on a computer, a notification appears on the Dashboard page in Portal. When your E2 hardware is set up and configured, you can set up backups for the computer.
Backups are set up using “backup jobs”. A backup job specifies which data to back up on a system, and is usually scheduled to run automatically.
To ensure that your data is backed up to your E2 hardware every night and then sent to the cloud, Portal can automatically create and schedule the following backup jobs:
•For a 64-bit Windows computer, Portal can automatically create an Image Bare Metal Restore (BMR) backup job that backs up all volumes on the computer. This type of backup can be restored using recovery media. See Restore a Windows computer using recovery media.
•For a 32-bit Windows computer, Portal can automatically create a backup job that backs up the C drive.
•For a Linux computer, Portal can automatically create a backup job that backs up everything from the root.
For a vSphere environment, you can associate the environment with an E2 and then manually create and schedule backup jobs that specify which VMs to back up. See Add a vSphere backup job.
For a Hyper-V environment, you can manually create and schedule backup jobs that specify which VMs to back up. See Add and schedule a Hyper-V backup job.
To set up backups for a computer:
Note: Before setting up backups for a computer, make sure that your Recovery USB flash drive or any other USB storage device is not plugged into the computer.
1. In a web browser, go to the Portal website and sign in.
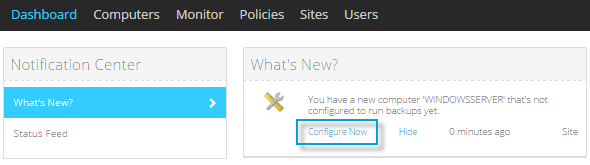
If agent software has been installed on a new computer, a notification appears in the “What’s New” area of the Dashboard.
Note: This notification appears below any E2 Setup Center messages on the Dashboard. See Check the status of your E2.
2. In a new computer notification, click Configure Now.
If you do not have an E2 that is ready to accept backups, a message states that the E2 setup is still in progress. Click Cancel in the message box and try to set up backups again later.

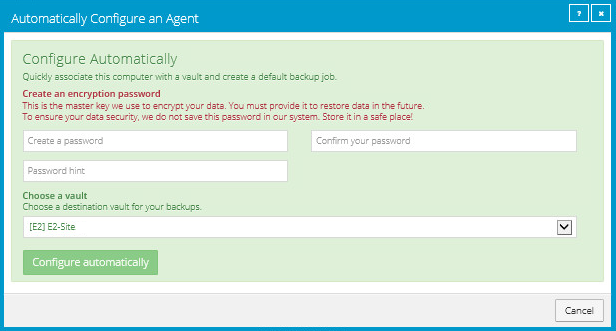
If your E2 is ready and you are setting up backups for a Windows or Linux computer, an Automatically Configure an Agent box appears.
Do the following:
a. Enter an encryption password in the Create a password and Confirm your password boxes.
Important: Your encryption password is required for restoring your data, so be sure to store it somewhere safe. If you forget the password, you will not be able to restore your data. The password is not maintained anywhere else and cannot be recovered.
b. In the Password hint box, enter a hint to help you remember the encryption password.
c. If you are a partner and are setting up backups for an E2 customer, choose the customer’s site from the Assign the computer to a site list.
Note: The site list does not appear if you are signed in as a customer.

d. If you have more than one E2 that is ready to accept backups, choose an E2 for receiving backups from the Choose a vault list.
e. Click Configure automatically.
Backups are then configured for the computer. You can view the resulting “CloudServerBackup” backup job on the Computers page. See View computer and backup information.
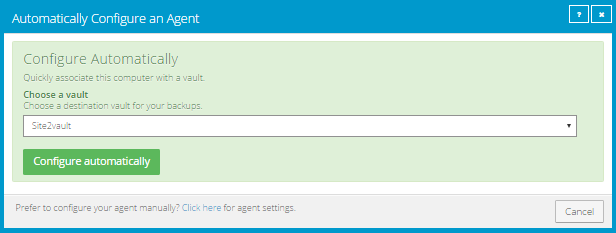
If your E2 is ready and you are setting up backups for a vSphere environment, an Automatically Configure an Agent box appears.
Do the following:
a. From the Choose a vault list, choose an E2 for receiving backups.
b. If you are a partner and are setting up backups for an E2 customer, choose the customer’s site from the Assign the computer to a site list.
Note: The site list does not appear if you are signed in as a customer.
c. Click Configure automatically.
You can then create and schedule backup jobs manually. See Add a vSphere backup job.
If you are setting up backups for a Hyper-V environment, the Computers page shows the environment. You can then create and schedule backup jobs manually. See Add and schedule a Hyper-V backup job.