
When creating a new Hyper-V backup job, you can select VMs on the Virtual Machines tab to include in the job. You can only select VMs that appear on the Hyper-V Virtual Machines tab at the same time.
Note: If you select a VM that is already included in another job, the VM will not be added to the new job.
You can also add a Hyper-V backup job without selecting VMs on the Virtual Machines tab. See Add a Hyper-V backup job.
To add a Hyper-V backup job by selecting VMs:
1. On the navigation bar, click Computers.
The Computers page shows registered computers and environments.
2. Click the
Hyper-V environment row.
3. Click the Virtual Machines tab.
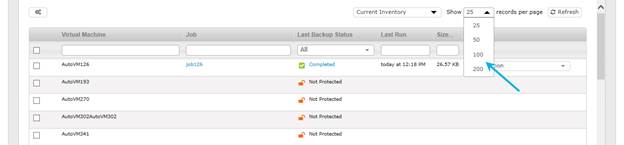
The Virtual Machines tab lists VMs in the Hyper-V environment. The Jobs column is blank for VMs that are not included in a backup job.
4. By default, the Virtual Machines tab shows 25 VMs at a time. If the VMs that you want to include in the job are not listed on the tab, click the Show <number of> records per page list, and click the number of VMs to show.
Note: A maximum of 200 VMs can appear on the Virtual Machines tab at the same time, and you can only select VMs that appear on the Virtual Machines tab. However, you can add more VMs to the job later in this procedure.
5. Do one of the following:
•Select the check box for each VM that you want to include in the backup job.
•Select the check box at the top left of the list to select all VMs on the page.
Note: If you select a VM that is already included in another job, it will not be added to the new job.
6. Click Create
Hyper-V Job. 
7. In the Create New Job dialog box, specify the following information:
•In the Name box, type a name for the backup job.
•In the Description box, type a description for the backup job.
•In the Destination list, select the vault where you want to save the backup data.
•In the Encryption Password and Confirm Password boxes, enter a data encryption password. You can also enter a password hint in the Password Hint box.
Important: You must enter the encryption password to recover your data. If you forget the password, you lose access to your data. The password is not maintained anywhere else and cannot be recovered.
Note: Hyper-V backup data is encrypted using the AES 256 encryption method.
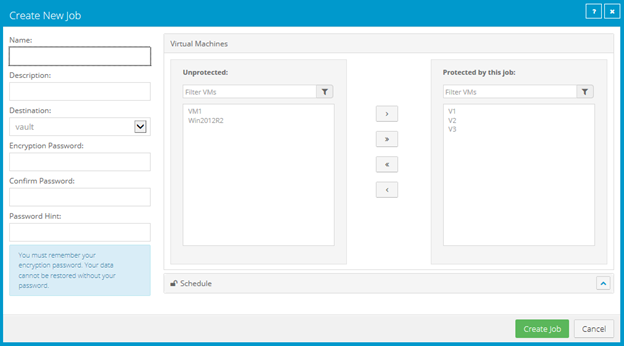
8. Do one or more of the following until the Protected by this job box shows all VMs that you want to include in the job:
•To find one or more VMs in the Unprotected or Protected by this job box, enter characters from the VM names in the associated Filter VMs box.
•To add all VMs in the Unprotected box to the backup job, click
Protect all. 
•To add some VMs in the Unprotected box to the backup job, select
the VMs in the Unprotected box, and then click Protect selected.

To select multiple VMs in the list, press CTRL and click the VM names. To select multiple consecutive VMs in the list, press Shift and then click the first and last VM that you want to select.
•To remove all VMs in the Protected box from the backup job, click
Unprotect all. 
•To remove some VMs in the Protected box from the backup job,
select the VMs in the Protected box, and then click Unprotect
selected. 
To select multiple VMs in the list, press CTRL and click the VM names. To select multiple consecutive VMs in the list, press Shift and then click the first and last VM that you want to select.
Ensure that each VM that you want to include in the backup job appears in the Protected by this job box.
9. To schedule the backup job to run, click Schedule. In the Schedule box that appears, create one or more schedules. See Add or edit a schedule for a Hyper-V backup job.
10. Click Create Job.