With the E2 data protection solution, your computers are backed up every night to E2 hardware. Backups are then securely and automatically copied to the cloud to ensure that your computers are always protected.
Get started with E2
Your E2 hardware is shipped to you after you order the data protection solution. After you receive the shipment and get an Ethernet cable, you can set up E2 data protection using the following steps.
Step 1. Set up your E2 hardware
To set up your E2 hardware:
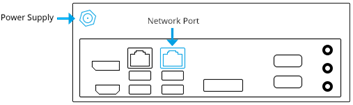
1. Connect the provided power cord to the power supply on the back of the E2 hardware, and plug it into a power outlet. If possible, plug the hardware into a universal power supply so that it is always ready to receive backups.
2. Connect an Ethernet cable to a network port on the back of the E2 hardware, and plug it into a network port (e.g., on your router).
3. Press the Power button on the front of the E2 hardware. A blue power indicator light turns on when the hardware has power, and the E2 beeps five times.
E2 then starts its initial configuration.
Step 2. Initial E2 Configuration
When the E2 first starts, it downloads and installs the latest E2 software from the cloud. Depending on the speed of your internet connection, this initial E2 configuration can take some time.
Please do not unplug the E2 while it is configuring.
You cannot set up backup jobs until the initial configuration is finished. To determine whether your E2 is configured and ready for backups, you can check messages in Portal. See Check the status of your E2.
Step 3. Download and install agent software
You must install agent software on every computer that you want to protect.
To download and install agent software:
1. In a web browser, go to the Portal website. Sign in using the username and password you received in your purchase confirmation and credential emails.
When you sign in to Portal, you might be prompted to change your password or verify your account. See Sign in to Portal.
2. In Portal, on the right side of the Dashboard, click Add computer.
3. Using the Agent Downloader dialog box, download agent software and install it on the computer that you want to protect.
See Download and install agent software for a computer.
Step 4. Set up your backups
After installing agent software on a computer, you can set up backups. You must set up backups for every computer that you want to protect. See Set up backups for a computer.
After setting up backups, you can monitor your backups and storage usage using Portal. See Monitor your backups and storage usage.
Prepare your recovery media
Using the E2 data protection solution, you can restore an entire Windows computer, including its operating system. Before you can do this, you must prepare the Recovery USB flash drive that was provided with your E2 hardware. Prepare the flash drive when you receive your hardware, so that it will be ready if you need it. See Prepare your recovery media.
To restore a Windows computer using recovery media, see Restore a Windows computer using recovery media.
To restore selected files and folders instead of restoring an entire machine, see Restore files and folders from backups.
For information and assistance
For more information and assistance with your E2, see Get information and assistance.